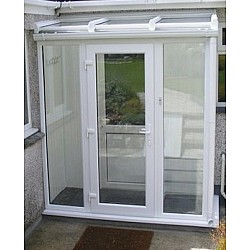
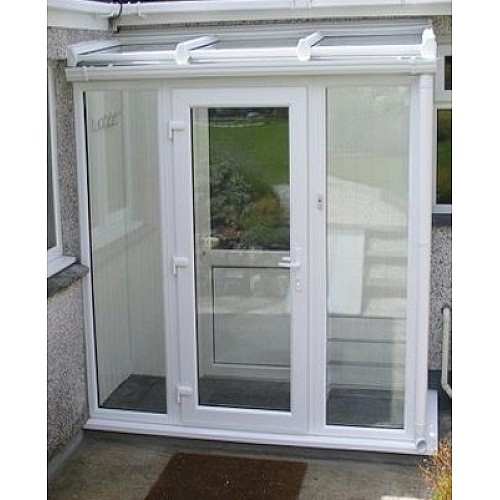
3.0m x 2.5m Lean-To Porch with Full-Height Glazed Panels
£4,659.12
- Brand: Master Plastics
- Product Code: FHPORCH3.0x2.5
- Availability: In Stock
Product Description:
Elevate your entryway with our 3.0m x 2.5m Lean-To Porch, featuring full-height glazed panels that provide natural light and a sleek, modern look. This porch includes a variable pitch roof that can support either polycarbonate or glass, depending on your preference. Its sturdy construction, energy-efficient glazing, and customizable features make it an ideal solution for any home.
Key Features:
- Dimensions: External width up to 3.0m and projection up to 2.5m, offering a spacious entryway.
- Roof: Variable pitch roof to support polycarbonate or glass (25mm) for optimal insulation and durability.
- Glazing: Low-e toughened, A-rated, argon-filled double-glazed units with warm edge spacer bars for enhanced thermal performance.
- Frame Heights: Front frame height up to 2100mm at the eaves beam and 2400mm to the wall plate (excluding the roof).
- Customization Options:
- Roof Glazing: Choose between polycarbonate or glass roofing for your porch.
- Opening Top Windows: Select the number of opening windows for improved ventilation.
- Frame Colour: Options include White, Light Oak, or Rosewood to match your aesthetic.
- Door Furniture Colour: Choose from White, Chrome, or Gold for the door fittings.
- Door Positioning & Opening: Specify where the door is located and whether it opens inward or outward.
- Cylinder Options: Choose from 1-star anti-pick or 3-star high-security locking cylinders.
Installation Instructions:
- Prepare the Cill: Cut the oversized cill to the desired length using a straight edge and level it against the wall.
- Secure the Cill: Attach the cill to the brickwork or blocks with appropriate fixings (size 10 screws for timber bases or nylon frame anchors for brick/concrete).
- Frame Assembly: Position the frames on the cill, ensuring proper alignment. Use self-tapping screws to join the frames and corner posts.
- Wall Fixing: Once aligned, screw the frame securely to the cill and attach it to the wall.
- Roof Installation: Attach the roof bars and fasten them in place, followed by the polycarbonate sheets or glass. Finish the flashing around the roof.
- Glazing: Place the glass into the frame and fix the glazing beads. Clean all parts before securing the glass for an optimal finish.
Delivery Service:
For assistance with unloading, select the 2-man delivery option for an additional surcharge.